Add A Scrolling Share Bar Into Blogger™ To Engage Your Readers ...
This is a follow up to a previous installment where we shared details on how to Add A Share Bar In Zen Cart ... However, since we utilize the Blogger network to host our own website, we thought it would be rather cool if we shared the process on how to add a scrolling Social Media Share Bar In Blogger ...
If you hadn't already realised, the sharing function ability within Blogger is somewhat lacking. Sure, you can add a gadget to your side bar that may allow for social media sharing amongst a site or two, but what if you want to keep your company telephone number or other details available to your readers throughout your page?
This method allows for a fully functioning social media share bar in Blogger which keeps your company name and telephone number in full view of your potential customers / readers as they scroll down further into the page to find information, services or products that you offer. You may have already scrolled down to find this sentence and if you did, you will have already seen the scrolling share bar in action. If you didn't, then try it out and you will see this really cool social media scroll bar in all it's glory!

How To Find The Share Bar & Add Your Logo / Telephone Number
The share bar is available by visiting the ShareThis Website <click here> ... However, before you go trotting off to grab everything in sight, we suggest you assemble your logo.
The logo is sized at 300 x 40 pixels and can either be produced using a vector image and saved as a gif file. (gimp <click here> is a suitable program for doing this) OR you can produce a very simple jpg or png image as we have done for this website. Personally, we like the white background as it 'sticks out' a little better on the share bar.

OK .. once you arrive at the ShareThis website you simply click on the 'Get The Button' Box (as shown above), this in turn will open up a second page where you get to choose the website format for the share bar to operate. N.B. Ignore The 'Blogger' Box ! ... choose instead the 'WWW' platform
Once you have selected the box then look to the far right and click on 'Pick A Style'

The style of share bar that scrolls down from the top of the page, which remains invisible until a visitor scrolls down the page is found in the centre column at the bottom (as shown in the picture opposite)
Click to select the box then move forwards to 'Customize' the social network share bar to suit your own needs.

This final step to Customize Your Share Bar is where you get to select various social media websites.
We recommend initially to select both the tick boxes, so that the share bar will track who is sharing your website and with which social network.
In addition to this you will need to have uploaded your logo to a server, so that it will be shown when the share bar is activated. You can upload to a number of websites including Facebook & Google, just remember to copy and paste the image url <web address> into the box provided.
Finally, you get to choose exactly which social media websites you wish to provide for your readers. In our case we chose, Facebook, Google+, Twitter, Blogger, Linkedin, Pinterest, Wordpress, Stumbleupon, Folkd, Reddit, ShareThis & Email To A Friend Options. Arrangement of these sites is a simple matter of 'drag and drop' into position in the left hand bar that is provided. A preview is always available at the top of the page.
Once you are fully satisfied with your choices the click on the 'Get The Code' link. This opens a pop up that ask you to register with ShareThis, we suggest you do so because this is where you will gain access to your tracking data.

How To Enter The Share Bar Code Into Blogger
As you can see from the picture opposite there are three sections of share bar code to select. The process is slightly different from adding into Zen Cart because of the way that Blogger template information is arranged.
The first thing you need to do is copy the code within the first box on the code screen. Then we need to go into the template section of the Blogger dashboard.

Once you open this page, you need to click on the 'Edit HTML' link. This will open up the template code for you to add your copied code from the share bar code.
Place this code immediately AFTER the <head> code. this will produce an extra three lines of code.
Secondly, return to the share bar code and copy the bottom box of code. For the time being ignore the 'CSS code' as this will be added later.
Back to the Blogger template code ... now, scroll down to the bottom of this code and you will need to find a line a little way up off the bottom that reads .. </macro:includable> ... place your share bar code immediately AFTER this line.
You may then SAVE TEMPLATE
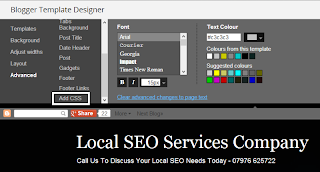
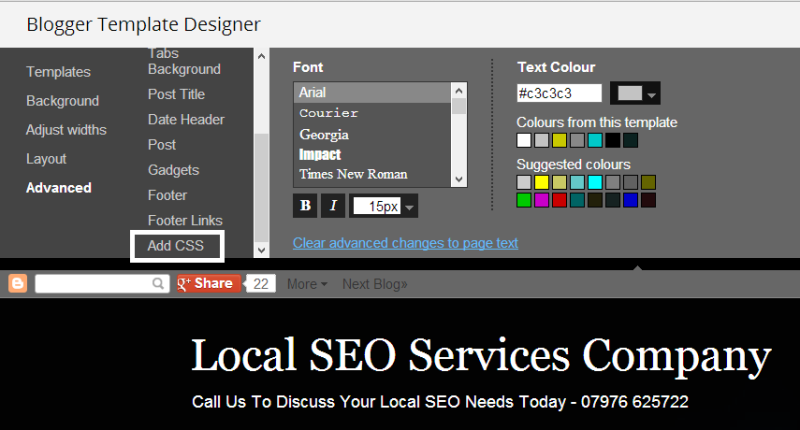
Now, we need to add the CSS information from the share bar code .. copy the details from the CSS box and return to Blogger template ... this time we are going to select the CUSTOMIZE button. Once this page opens, you need to select the advanced section, scroll down to find Add CSS ... click the link and a box opens up in the right window.
 This box is normally empty and you will need to paste your copied share bar CSS code into this box.
NB .. Delete the following two lines from the code ..
<style type="text/css"> .. found at the very beginning of the code
</style> ... found at the very end of the code
Once you have deleted these two lines, look to the top right of the screen and click on 'APPLY TO BLOG' ..
Your Social Media Share Bar In Blogger should now be fully functional and working towards getting your company / products / services shared around the world.
If you experience any difficulties in adding the share bar to Blogger, then please do not hesitate to contact us via the telephone number shown in our social media share bar above .. or alternatively, leave us a comment below and we will address your issues.
You may then SAVE TEMPLATE
Now, we need to add the CSS information from the share bar code .. copy the details from the CSS box and return to Blogger template ... this time we are going to select the CUSTOMIZE button. Once this page opens, you need to select the advanced section, scroll down to find Add CSS ... click the link and a box opens up in the right window.

NB .. Delete the following two lines from the code ..
<style type="text/css"> .. found at the very beginning of the code
</style> ... found at the very end of the code
Once you have deleted these two lines, look to the top right of the screen and click on 'APPLY TO BLOG' ..
Your Social Media Share Bar In Blogger should now be fully functional and working towards getting your company / products / services shared around the world.
If you experience any difficulties in adding the share bar to Blogger, then please do not hesitate to contact us via the telephone number shown in our social media share bar above .. or alternatively, leave us a comment below and we will address your issues.
This is one technology that I would love to be able to use for myself. It’s definitely a cut above the rest and I can’t wait until my provider has it. Your insight was what I needed. Thanks
ReplyDelete