Website Structure For Effective SEO

Effective SEO Foundations

Website Structures - If The Foundations Are Weak Your Home Collapses ...

Effective SEO is not about getting as many keyword phrases into the structure of your website as possible, In addition, it isn't all about throwing a heap of back links at your site so that you falsely generate 'link juice' to artificially inflate your website within the search engine results. A website structure is very much like building a home, where the foundation is the most critical element of stability.

For those of you that are too lazy to read copious amounts of information regarding the ins and outs of effective search engine optimization, then we'll cut to the chase and bullet list the main elements.

 Effective Foundations For Website Structures

  • URL - Domain Name / Home Address
  • Hosting
  • Website Folders / Categories
  • Website File Names / Product Names
  • Titles
  • Descriptions
  • Headings
  • Content
  • Image Attributes
  • Internal Links
  • External Links
  • Marketing

Domain Name Structure

Domain Names - Your Home From Home


There are debates abounding around the SEO community regarding EMD.s (exact match domain names) ... which at one point was almost a pre-requisite to ensure your website got noticed within the search engine results. Well, we're here to tell you that those days are over, however, not totally over!

EMD.s can still work, if you structure your website correctly and do not try and over optimize the site with keyword phrase after keyword phrase, all with the intent of manipulating the search engines towards your home. Things have become much more subtle and a single mention of your main keyword is now normally enough to begin the process towards effective SEO.

As an example, let's consider that your website is relative to 'shoes', but more so towards women's high heeled shoes. A little while ago some bright spark may well have gone out of their way to acquire the domain name 'WOMENSHIGHHEELEDSHOES.COM' .. which a little while ago may well have had the desired effect. However, in these days of improving algorithms and website penalties, it would be wiser to attempt to 'brand' your home while suggesting relevance to the keyword 'shoes'.

A better solution for effective website structure would be to find a shortened domain name that is memorable and brand worthy. Suggestions could be 'SMARTSHOES.COM' or ' SHINYSHOES.CO.UK' .. please note at this point that domain names specific to your target country is preferred, unless you are going for worldwide domination, whereby the .COM would suffice to cover all bases.

Website Hosting - Foundations To Your Structure


This section is brief, yet, none the less important ... the principals here are simple, ensure that your domain is hosted on effective hosting. There is little point in building a website onto a server (hosting) that cannot display your information quickly, efficiently and without interruption. There will be some guesswork here in relation to the demands that you expect to receive from the eager public and the type of information you wish to share. If the website is structured in such a way as to make large demands on servers, such as video, downloads, uploads etc. then obviously go for the best that money can buy, however if you are a small to medium sized business a much smaller space will be required to host your website effectively. 

There is copious amounts of information already available across the web in relation to website hosting, so we don't feel it is necessary to duplicate any further ... if your in doubt, you could always contact us to discuss your requirements, reasonably, and without any hard selling or unreasonable demands upon your budget. Sometimes, the best things in life ARE actually FREE...

Website Folders - Assembling The Ground Floor & Directions Around Your Home


This is where your website structure starts to take shape and is where you direct your customers to various departments within your building. On every server there will be some type of root folder or entrance way. Your home page or index page will be stored here along with critical elements of directing search engines around your website. Files such as index, sitemap, robots and server access should be stored within this space. We'll discuss files later, however, the index file is the most important structural infrastructure to pay attention to.

It really is the doorway to your empire and if you try to over optimise this file by stuffing keyword phrases into titles, descriptions, headings and content, then the cracks begin to appear and before you know it, the entire structure will begin to collapse around your ears, never again to be seen in any search engine results in any effective manner.

Further details will emerge as we delve deeper ... but for now, let us return to our shoes domain. Within this site, were trying to target women's shoes. so we need to build folders surrounding the most important categories within our site. Therefore we begins building other folders around our root folder. Folders such as womens shoes or womens high heeled shoes. Our website structure then begins to look like this .. 

SHINYSHOES.COM/WOMENS-SHOES/ or SHINYSHOES.COM/WOMENS-HIGH-HEELED-SHOES. ... further folders may then be added following the secondary folder with greater relevance .. such as ... SHINYSHOES.COM/WOMENS-HIGH-HEELED-SHOES/3-INCH-HEELS/ or  SHINYSHOES.COM/WOMENS-HIGH-HEELED-SHOES/4-INCH-HEELS/ etc.

Even deeper folders can also be added where we now funnel down to targetting a specific colour e.g. SHINYSHOES.COM/WOMENS-HIGH-HEELED-SHOES/3-INCH-HEELS/BLUE-SHOES/ or SHINYSHOES.COM/WOMENS-HIGH-HEELED-SHOES/3-INCH-HEELS/RED-SHOES/

PLEASE NOTE .. all of these references we make should be in lower case letters, we have capitalised them for your convenience ...

The above examples are somewhat over-optimised, and would be better served with shorter folder names such as shinyshoes,com/womens-high-heeled-shoes/3-inch/blue/ ... we just wanted you to get the idea of what folders are for and how the website structure benefits from effective utilisation. Everything gets neatly organized and put away in the appropriate compartment for ease of use for both yourselves, potential customers and especially search engine robots.

Website File Names .. Putting The Roof On

File names, like any of the other aspects can be optimised for effective SEO .. again, we shall use our shinyshoes website to demonstrate ... the final element to add could be something similar to a brand name and shoe size, however check with the branded company first, some will allow you to add their brand names to your file names, some will not.

For this example we will use a fictitious brand of FRED BLOGGS ... therefore our final url becomes ...

shinyshoes,com/womens-high-heeled-shoes/3-inch/blue/fred-bloggs-size-4.html

The .html part only indicates the type of file used within your coding, it could just as easily be php or aspx etc. As you can see we have now neatly organised the entire website address for these particular brand of shoes and their size, colour, heels size and of course the all important fact that they are women's high heeled shoes.

Our next installment will cover the importance of Titles, Descriptions, Headings, Content, Image Attributes, Internal Links, External Links & Marketing ..


How To Add A Social Media Share Bar In Blogger


Add A Scrolling Share Bar Into Blogger™ To Engage Your Readers ...

This is a follow up to a previous installment where we shared details on how to Add A Share Bar In Zen Cart ... However, since we utilize the Blogger network to host our own website, we thought it would be rather cool if we shared the process on how to add a scrolling Social Media Share Bar In Blogger ...

If you hadn't already realised, the sharing function ability within Blogger is somewhat lacking. Sure, you can add a gadget to your side bar that may allow for social media sharing amongst a site or two, but what if you want to keep your company telephone number or other details available to your readers throughout your page?

This method allows for a fully functioning social media share bar in Blogger which keeps your company name and telephone number in full view of your potential customers / readers as they scroll down further into the page to find information, services or products that you offer. You may have already scrolled down to find this sentence and if you did, you will have already seen the scrolling share bar in action. If you didn't, then try it out and you will see this really cool social media scroll bar in all it's glory!

How To Find The Share Bar & Add Your Logo / Telephone Number


The share bar is available by visiting the ShareThis Website <click here> ... However, before you go trotting off to grab everything in sight, we suggest you assemble your logo.

The logo is sized at 300 x 40 pixels and can either be produced using a vector image and saved as a gif file. (gimp <click here> is a suitable program for doing this) OR you can produce a very simple jpg or png image as we have done for this website. Personally, we like the white background as it 'sticks out' a little better on the share bar. 

OK ..  once you arrive at the ShareThis website you simply click on the 'Get The Button' Box (as shown above), this in turn will open up a second page where you get to choose the website format for the share bar to operate. N.B. Ignore The 'Blogger' Box ! ... choose instead the 'WWW' platform 

Once you have selected the box then look to the far right and click on 'Pick A Style'

The style of share bar that scrolls down from the top of the page, which remains invisible until a visitor scrolls down the page is found in the centre column at the bottom (as shown in the picture opposite)

Click to select the box then move forwards to 'Customize' the social network share bar to suit your own needs.


 This final step to Customize Your Share Bar is where you get to select various social media websites.

We recommend initially to select both the tick boxes, so that the share bar will track who is sharing your website and with which social network.

In addition to this you will need to have uploaded your logo to a server, so that it will be shown when the share bar is activated. You can upload to a number of websites including Facebook & Google, just remember to copy and paste the image url <web address> into the box provided.

Finally, you get to choose exactly which social media websites you wish to provide for your readers. In our case we chose, Facebook, Google+, Twitter, Blogger, Linkedin, Pinterest, Wordpress, Stumbleupon, Folkd, Reddit, ShareThis & Email To A Friend Options. Arrangement of these sites is a simple matter of 'drag and drop' into position in the left hand bar that is provided. A preview is always available at the top of the page.

Once you are fully satisfied with your choices the click on the 'Get The Code' link. This opens a pop up that ask you to register with ShareThis, we suggest you do so because this is where you will gain access to your tracking data.

How To Enter The Share Bar Code Into Blogger


As you can see from the picture opposite there are three sections of share bar code to select. The process is slightly different from adding into Zen Cart because of the way that Blogger template information is arranged.

The first thing you need to do is copy the code within the first box on the code screen. Then we need to go into the template section of the Blogger dashboard.

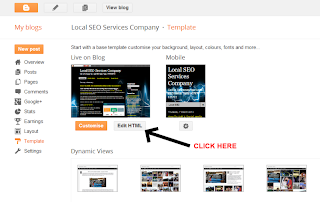
Once you open this page, you need to click on the 'Edit HTML' link. This will open up the template code for you to add your copied code from the share bar code.

Place this code immediately AFTER the <head> code. this will produce an extra three lines of code.

Secondly, return to the share bar code and copy the bottom box of code. For the time being ignore the 'CSS code' as this will be added later.

Back to the Blogger template code ... now, scroll down to the bottom of this code and you will need to find a line a little way up off the bottom that reads ..  </macro:includable> ... place your share bar code immediately AFTER this line.

You may then  SAVE TEMPLATE


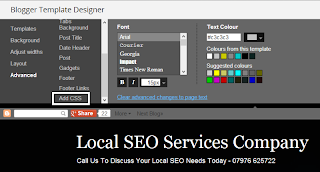
Now, we need to add the CSS information from the share bar code .. copy the details from the CSS box and return to Blogger template ... this time we are going to select the  CUSTOMIZE button. Once this page opens, you need to select the advanced section, scroll down to find Add CSS ... click the link and a box opens up in the right window.


  This box is normally empty and you will need to paste your copied share bar CSS code into this box.
NB .. Delete the following two lines from the code ..

<style type="text/css"> .. found at the very beginning of the code

</style> ... found at the very end of the code


Once you have deleted these two lines, look to the top right of the screen and click on 'APPLY TO BLOG' .. 

Your Social Media Share Bar In Blogger should now be fully functional and working towards getting your company / products / services shared around the world.

If you experience any difficulties in adding the share bar to Blogger, then please do not hesitate to contact us via the telephone number shown in our social media share bar above .. or alternatively, leave us a comment below and we will address your issues.


How To SEO Blogger Titles & Meta Descriptions

Standard Blogger Template Titles & Descriptions Are NOT Search Engine Friendly !

Unfortunately the above statement is a fact of life for users on the Blogger network. Individuals and companies alike rely upon Blogger templates to do the bulk of the work in respect to SEO (search engine optimization)

However, the standard templates within Blogger leave a lot to be desired in respect to titles and meta descriptions. Even though Google rolled out additional SEO features for Blogger by adding a Search Description option within post settings, this does not automatically ensure that your description settings are displayed within the source code of individual posts or pages across your blogger site. Template code adjustments are therefore needed.

Blogger Titles :


With standard Blogger templates the title of your individual posts or pages are normally preceded by the title set within the Settings - Basic section of the Blogger dashboard.

This in itself ruins good SEO principles as the search engines will first see the title of your blog followed by the title of your blog post or page. As an example, this post would title within search engines as 'Local SEO Services Company : How To SEO Blogger Titles & Meta Descriptions' .. this type of title is ineffective for SEO purposes as it is too long and is devalued for the effectiveness of the intent of the title. Our intent is to appear for 'How To SEO Blogger Titles & Meta Descriptions' as this carries more weight with search engines and is more relevant to the content.

Blogger Descriptions :


Even though Blogger now allows the ability to add search descriptions into the post settings, the failure once again is the standard template structure which does not have the ability to effectively display this information within the browsers that we all use.

Therefore it is necessary to adjust the html coding within individual templates so that the correct description shows with the appropriate post or page that we create. Luckily this is easily accomplished by replacing one piece of code with a much more useful and SEO friendly code that displays exactly what we need and more importantly the essential information that search engines prefer.

How To Make Your Blogger Template Titles & Descriptions SEO Friendly ...


The first thing to do is click on 'Template' within the blogger dashboard and then click 'Edit HTML' 

A screen will pop up with the code displayed ... look down a few lines into the code and you will find a line that states ...

<title><data:blog.pageTitle/></title>


Replace The Standard Blogger Template Code With ...


<title>
<b:if cond='data:blog.pageName == &quot;&quot;'>
<data:blog.pageTitle/>
<b:else/>
<data:blog.pageName/>
</b:if>
</title>
<b:if cond='data:blog.metaDescription != &quot;&quot;'>
<meta expr:content='data:blog.metaDescription' name='description'/>
</b:if>

Copy & Paste The Above Code Into The Template and your Blogger Titles & Meta Descriptions will now be fully SEO Friendly - 100% Guaranteed !

If you need any further assistance in respect to making Blogger Titles & Descriptions SEO Friendly, Then please contact us, we are more than willing to help ...


How To Add A Social Media Share Bar In ZenCart

Add A Cool Share Bar Into Zen Cart And Keep Your Customers Engaged ...

We mentioned to a client of ours that the social media sharing on their Zen Cart™ powered Audio Visual Installation Website was somewhat lacking in user interaction, so we suggested using a rather neat little share bar from ShareThis.

This would allow for a fully functioning social media share bar whilst keeping their business contact telephone number prominent on the page as website visitors scrolled down deeper into the page to find information on services and products.

How To Find The Share Bar And Add A Logo


Visit the ShareThis Website ...

Click on the 'Get The Button Box' (currently green in colour as we write this)

This will open up a second page where you can select the type of website format onto which to add the share bar.

Choose the 'www platform' as the type

There are many other options available however for zen-cart integration this is the best platform available

Once you have selected the box then look to the far right and click on 'Pick A Style'

The style of share bar we chose was one that places sharing buttons at the top of the page but is only visible when a website user scrolls down the page ..

This allows the website theme to be fully visible without being crowded out by the share bar. It also allows for the addition of a logo to the share bar where the company logo and telephone number is always visible to any potential customer.

The logo is sized at 300 pixels by 40 pixels and we suggest that a vector image is created and saved as a gif type image. We utilized a free service to achieve this from gimp. You will need to upload this image to a web server as this is how the share bar imports the logo.

The final step is the 'Share Bar Customization'

We recommended inserting ticks into both the  available boxes, this will allow you to track who is sharing what and where.

In addition to this you will need to provide the url of the company logo with telephone number and finally choose the share buttons you would like to add and position them accordingly. We chose in this case, Facebook, Google+, Twitter, Linkedin, Pinterest, Blogger, Reddit, Stumbleupon, Delicious, Folkd, ShareThis & Email Yhis To A Friend options in that order. There are many more sharing websites you could add, however for display purposes we recommend no more than 12 choices

When you are satisfied with your share bar then click on 'Get The Code', this will then trigger a pop up for you to register with share this to allow you to track your shares. The very final page shows you the necessary code to add to your zencart templates.

How To Enter The Share Bar Code Into Zen Cart


The 'head section code' should be added into the header.html file under all other calls for javascript

The 'CSS code' should be entered into the stylesheet_main.css file... N.B. during this process we recommend deleting the <style type="text/css"> line at the beginning of the code along with the </style> at the end of the same piece of code ... we discovered it was causing issues with the way that the share bar was being presented on screen.

Finally, for the 'code to be placed at the end of the page', we added this to the tpl_footer.php file under all the other php script at the bottom.

Everything should then be displaying correctly and ready to share your zen cart website with the world. Here are example pictures of what the share bar looks like once integrated into zencart.


If you have any questions or need assistance in integrating a share bar in zen cart, then give us a call and we will be happy to assist.